- Cflow
- Software Development Project Automation
Software Development Project Automation

Clow Team

Managing software development projects manually often leads to missed deadlines, communication breakdowns, and scope creep. A typical software project involves multiple stakeholders across engineering, QA, DevOps, and project management, and without automation, these teams struggle to stay aligned.
Research shows that over 55% of software projects fail due to poor coordination and lack of structured workflows. Manual task allocation, ad-hoc status tracking, and scattered feedback loops make it hard to maintain code quality and release on time.
This guide outlines how Cflow automates software development project workflows — from initiation and sprint planning to code reviews, QA testing, and deployment approvals.
What Is Software Development Project Automation?
Software Development Project Automation refers to the use of no-code workflows and rule-based logic to orchestrate each stage of the software development lifecycle. From capturing project requirements to managing development sprints, review gates, test signoffs, and release cycles – the entire process is automated.
Imagine launching a new product feature. Without automation, developers wait for tasks, QA teams juggle test logs, and release managers lose visibility. With Cflow, every task flows logically from one team to the next, based on completion, conditions, or role-based triggers.
Automated workflows in software projects help eliminate idle time, ensure traceability, and drive delivery velocity without compromising quality.
Why Software Development Automation Matters
Delivery Speed
Accountability
Visibility
Code Quality
Key Benefits of Automating Software Projects with Cflow
- Centralized Sprint Dashboard: Cflow provides a unified view of backlog grooming, sprint progress, blockers, test results, and deployment readiness. This eliminates fragmented tools and enables agile visibility across the board.
- Custom Project Templates: Teams can create workflow templates for new features, bug fixes, technical debt, or DevOps changes. These templates include predefined form fields, routing logic, review sequences, and auto-notifications.
- Multi-Team Collaboration: Workflows span multiple departments: developers, QA, security, and deployment teams. Each team executes its responsibilities without manual follow-ups, and tasks progress automatically to the next stage.
- Quality Gate Automation: Cflow enables gatekeeping at every phase – code review, QA pass, UAT signoff, and security check. If any criteria aren’t met, the workflow halts until resolved, maintaining compliance and stability.
- Real-Time Notifications & SLAs: Automatic alerts remind stakeholders of pending reviews, overdue tasks, or test failures. Escalations are built in to prevent delays in delivery cycles.
- Audit Logs & Compliance: Every approval, file upload, commit ID, and test result is time-stamped and archived. This supports audit readiness, especially in regulated industries or ISO/Agile certifications.
- Remote Team Readiness: Cflow works seamlessly for distributed teams. Whether your developers are in Austin or testers in Seattle, everyone collaborates in sync.
Get the best value for money with Cflow
User Roles & Permissions
Project Manager
- Responsibilities: Create project record, define sprint scope, monitor progress.
- Cflow Permission Level: Admin
- Mapping: “Project Management” group
Developer
- Responsibilities: Acknowledge task, push code, update status.
- Cflow Permission Level: Task Owner
- Mapping: “Engineering Team” group
QA Lead
- Responsibilities: Test functionality, upload results, sign off on quality.
- Cflow Permission Level: Task Owner
- Mapping: “QA Team” group
Security Reviewer
- Responsibilities: Perform security audits on code/features.
- Cflow Permission Level: Approve/Reject
- Mapping: “Security Team” group
Release Manager
- Responsibilities: Coordinate UAT, manage release notes and production go-live.
- Cflow Permission Level: Final Approver
- Mapping: “Release Management” group
DevOps Engineer
- Responsibilities: Manage deployment artifacts, versioning, and staging environments.
- Cflow Permission Level: Task Owner
- Mapping: “DevOps Team” group
Discover why teams choose Cflow
Form Design & Field Definitions
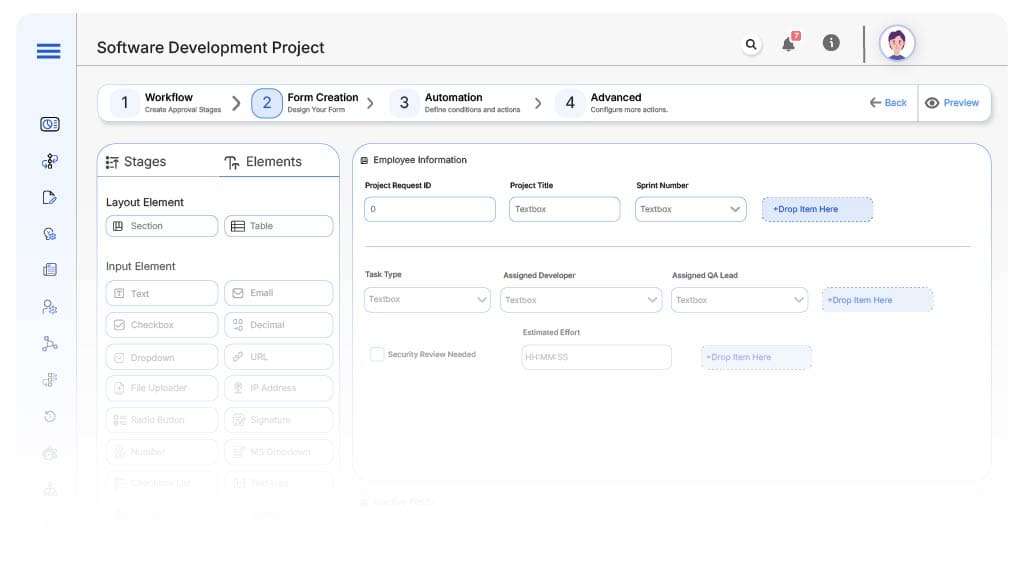
Field Label: Project Request ID
- Type: Autonumber
- Auto-Populate: on submission.
Field Label: Project Title
- Type: Text
- Logic/Rules: Required.
Field Label: Sprint Number
- Type: Dropdown (Sprint 1, Sprint 2, etc.)
- Logic/Rules: Required for sprint-based routing.
Field Label: Task Type
- Type: Dropdown (Feature, Bug Fix, Technical Debt, Security Patch)
- Logic/Rules: Drives conditional routing and field visibility.
Field Label: Assigned Developer
- Type: Dropdown
- Auto-Populate: Pulled from “Engineering Team” group.
Field Label: Assigned QA Lead
- Type: Dropdown
- Auto-Populate: Pulled from “QA Team” group.
Field Label: Security Review Needed
- Type: Checkbox
- Logic/Rules: If checked, triggers security review stage.
Field Label: Estimated Effort (hrs)
- Type: Number
- Logic/Rules: Required for sprint planning and workload management.
Field Label: Git Commit URL
- Type: Text (URL)
- Logic/Rules: Mandatory before QA can begin.
Field Label: Design Mockups / Attachments
- Type: File Upload
Logic/Rules: Required if Task Type is “Feature”.
Field Label: QA Test Plan Submitted
- Type: Checkbox
- Logic/Rules: Required before QA stage.
Field Label: UAT Feedback
- Type: Text Area
- Logic/Rules: Optional; visible only at release stage.
Field Label: Final Deployment Approval
- Type: Checkbox
- Logic/Rules: Must be checked by Release Manager to mark task complete.
Transform your Workflow with AI fusion
Approval Flow & Routing Logic
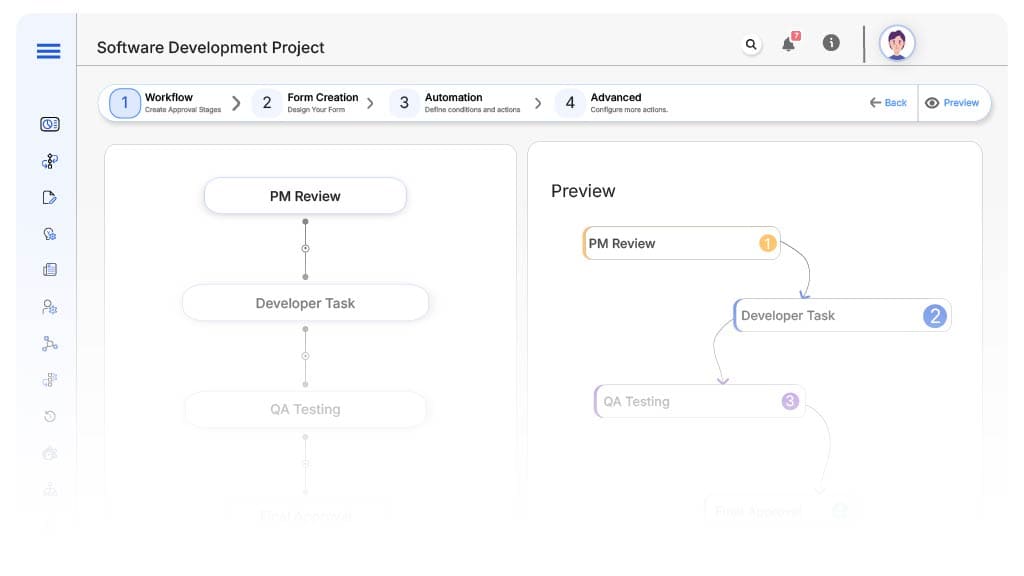
Submission → PM Review
- Status Name: Project Intake
- Notification Template: “New dev task submitted for {Title}. Please review and assign resources.”
- On Approve: Moves to Developer Task
- Escalation: Reminder after 2 days
PM → Developer Task
- Status Name: Pending Dev
- Notification Template: “{Developer}, your new dev task is ready: {Title}. Please start implementation.”
- On Complete: Routes to QA Testing
- Escalation: Reminder after 3 days
Developer → QA Testing
- Status Name: Pending QA
- Notification Template: “{QA Lead}, task {Title} is ready for testing.”
- On Pass: Routes to Security or Release
- Escalation: Reminder after 2 days
QA → Security Review (Conditional)
- Status Name: Pending Security
- Notification Template: “{Reviewer}, please conduct security audit for {Title}.”
- On Approve: Moves to Release
- Escalation: Reminder after 2 days
QA → Release Manager (If Security Not Required)
- Status Name: Ready for Release
- Notification Template: “{Release Manager}, QA passed for {Title}. Ready for release.”
- On Approve: Moves to Complete
- Escalation: Reminder after 1 day
Final → Deployment Complete
- Status Name: Complete
- Notification Template: “{Title} has been successfully deployed and archived.”
Transform your AI-powered approvals
Implementation Steps in Cflow
Create a new workflow
Design the form
Set up User Roles/Groups
Build flow
Configure notifications
Save and publish workflow
Test flow
Go live
Example Journey: Feature Launch for Customer Portal
FAQ's
Unleash the full potential of your AI-powered Workflow