- Cflow
- Employee Onboarding Process Automation
How to Automate Employee Onboard Process with Cflow

Clow Team

Cflow transforms onboarding into a seamless, automated workflow. Instead of juggling spreadsheets and countless emails, HR teams use a single platform to capture personal details, provision accounts, assign training, and prepare workspaces—all with conditional logic and real-time notifications. Approvers in IT, Facilities, and hiring managers receive tasks automatically, ensuring nothing falls through the cracks. This guide walks you through exactly how Cflow automates Employee Onboarding Process, from form design to first-day checklist.
Table of Contents
What Is Employee Onboarding Process?
In plain terms, think of onboarding as a coordinated relay race: HR passes the baton (the employee record) to IT, Facilities, and the hiring manager in sequence. Each department has predefined tasks—IT sets up email and software, Facilities readies desks and badges, and managers schedule training sessions. Without a unified system, these handoffs often rely on ad hoc emails or spreadsheets, increasing the likelihood of missed steps.
Recent industry research shows that 69% of organizations with automated onboarding tools report faster new-hire productivity and higher satisfaction. By capturing every task, form, and approval in one place, Cflow ensures a consistent, transparent, and efficient experience for new employees and the teams supporting them.
Why Employee Onboarding Process Is Important for HR Teams
Compliance & Risk Mitigation
First-Day Readiness
Engagement & Retention
Key Benefits of Automating Employee Onboarding Process with Cflow
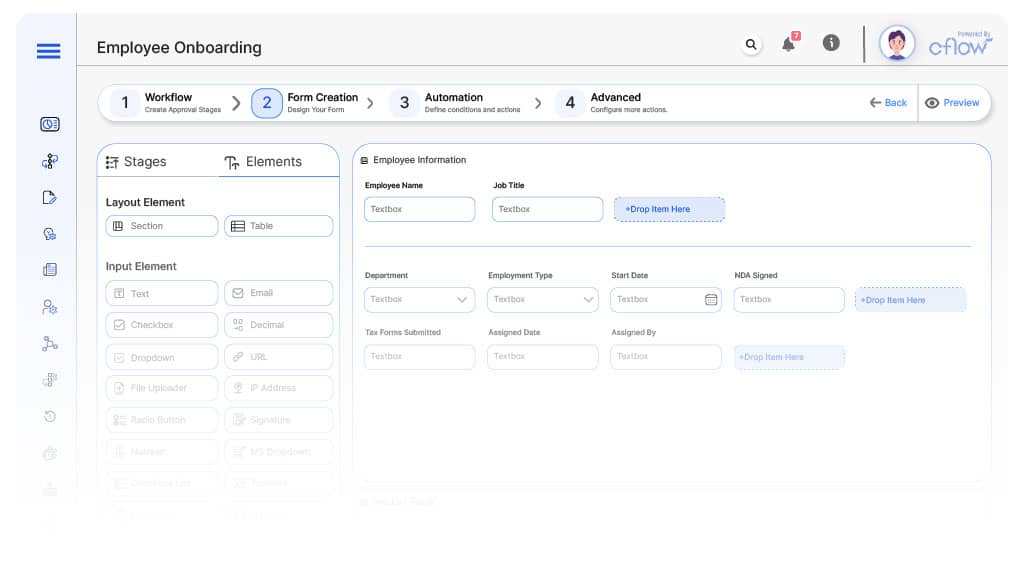
- Standardized New Hire Forms : Cflow’s form builder captures every required data point—from personal information and emergency contacts to policy acknowledgements and tax documents. Conditional sections ensure contractors only see relevant fields, while full-time hires complete payroll data. This standardized approach eliminates missing paperwork, reduces follow-up emails, and ensures HR has a complete, compliant record before Day 1.
- Automated Account Provisioning : Based on department and role, Cflow shows or hides tasks for creating email, Slack, VPN, and software accounts. For example, an Engineering hire sees tasks for GitHub access, while a Sales hire gets CRM credentials. Once HR approves, Cflow automatically notifies IT Admin with a tailored checklist, removing manual requests and speeding new-hire readiness.
- Manager & IT Task Assignments : After HR approval, Cflow’s multi-stage workflow routes tasks simultaneously to the Hiring Manager and IT Admin. Hiring Managers schedule orientation and assign mentors, while IT Admins provision hardware and software. If tasks aren’t completed within set timeframes, automatic reminders ensure timely completion, so all stakeholders stay aligned without constant HR intervention.
- Real-Time Notifications : At every stage, Cflow sends email and optional SMS alerts. New hires receive a “Welcome to Cflow” notification with login instructions once IT finishes provisioning. Hiring Managers and Facilities Coordinators get “Pending Tasks” alerts when it’s their turn. If any step is delayed—say, IT doesn’t act in 48 hours—Cflow escalates a reminder to HR, keeping the process on track.
- Compliance & Audit Trail : Cflow logs each action—who signed policy acknowledgements, when payroll details were entered, and which tasks were completed by each role. This comprehensive audit trail simplifies internal audits and regulatory reporting. HR can generate a compliance report in seconds, proving that every form was signed and every step was executed according to policy.
- Customizable Training Schedules : Cflow’s repeater fields let HR define department-specific training modules—“Code of Conduct” for all hires, plus “Security Training” for IT staff or “Sales Process” for Sales teams. The workflow automatically assigns these modules based on role, and Hiring Managers verify completion. This ensures relevant training is delivered efficiently, improving new hire competency and alignment.
- Mobile Accessibility : Whether approving tasks or completing checklists, new hires and approvers can interact with Cflow on any device. Hiring Managers can confirm workspace setup from their smartphones, and new hires can acknowledge policies on their tablets before Day 1. This flexibility removes location constraints and accelerates onboarding, especially for remote or traveling teams.
Get the best value for money with Cflow
User Roles & Permissions
Role Name: New Hire
Responsibilities: Complete personal information, upload ID and bank details, review and sign company policies, select preferred orientation slots.
Cflow Permission Level: Submit Form
Mapping: Assigned to “Employees” user group; can create/view only their own onboarding request.
Role Name: HR Manager
Responsibilities: Validate submitted data, assign initial orientation tasks, verify compliance documents, and trigger provisioning steps.
Cflow Permission Level: Approve/Reject, Admin
Mapping: Member of “HR Team” group; full access to all onboarding requests and form configuration.
Role Name: IT Admin
Responsibilities: Provision user accounts, configure software access, assign hardware assets, and update asset tracking.
Cflow Permission Level: Task Owner (Approve/Complete tasks)
Mapping: “IT Team” group; can view and complete only IT-related nodes in the workflow.
Role Name: Hiring Manager
Responsibilities: Schedule orientation, assign mentor, approve role-specific training modules and workspace requirements.
Cflow Permission Level: Approve/Reject, Reviewer
Mapping: “Hiring Managers” group; sees tasks after HR approval and can update mentor assignments and training schedules.
Role Name: Facilities Coordinator
Responsibilities: Prepare desk, badge access, parking permits, and any on-site security clearances.
Cflow Permission Level: Task Owner
Mapping: “Facilities” group; only visible if “Employment Type” ≠ “Remote,” completes physical setup tasks.
Discover why teams choose Cflow
Form Design & Field Definitions
Field Label: Employee ID
Type: Autonumber
Logic/Rules: Always generates unique ID prefixed “ONB-” on form creation; read-only.
Auto-Populate Rules: N/A
Field Label: First Name, Last Name
Type: Text
Logic/Rules: Required; alphabetic validation only.
Auto-Populate Rules: N/A
Field Label: Department
Type: Dropdown (Sales, Engineering, HR, Finance)
Logic/Rules: Required; if “Engineering” selected, show “Tech Stack Preference” repeater.
Auto-Populate Rules: N/A
Field Label: Job Title
Type: Text
Logic/Rules: Required.
Auto-Populate Rules: N/A
Field Label: Start Date
Type: Date Picker
Logic/Rules: Cannot be before today; defaults to next business day.
Auto-Populate Rules: N/A
Field Label: Employment Type
Type: Dropdown (Full-Time, Part-Time, Contractor)
Logic/Rules: Required; if “Contractor,” show “Contract End Date” field.
Auto-Populate Rules: N/A
Field Label: Payroll Information
Type: Repeater (Bank Name, Account Number, Tax ID)
Logic/Rules: Visible if Employment Type is Full-Time or Part-Time.
Auto-Populate Rules: If HR selects from Employee Database integration, auto-fill known fields.
Field Label: Equipment Needs
Type: Repeater (Laptop Model, Monitor, Phone)
Logic/Rules: Hidden for Contractors; if Department = Engineering, default “Laptop (16 GB RAM).”
Auto-Populate Rules: N/A
Field Label: Orientation Checklist
Type: Repeater with Checkboxes (ID Badge, Security Training, Policy Acknowledgement)
Logic/Rules: Always visible; read-only for new hire.
Auto-Populate Rules: N/A
Field Label: Mentor Assignment
Type: Dropdown (List of Employees)
Logic/Rules: Required if Department = Sales or Engineering.
Auto-Populate Rules: N/A
Field Label: Training Modules
Type: Repeater (e.g., Code of Conduct, System Access Training)
Logic/Rules: Conditional: show modules based on Job Title.
Auto-Populate Rules: N/A
Field Label: Welcome Package Sent
Type: Checkbox
Logic/Rules: Checked by HR Manager after sending welcome email.
Auto-Populate Rules: N/A
Field Label: Workspace Location
Type: Dropdown (Building A—Desk 12, Building B—Desk 5)
Logic/Rules: Hidden for Remote hires.
Auto-Populate Rules: N/A
Transform your Workflow with AI fusion
Approval Flow & Routing Logic
Submission → HR Manager Approval
Status Name: Pending HR Review
Notification: “A new Employee Onboarding request (ID: [Employee ID]) has been submitted by [New Hire]. Please review to proceed.”
On Approve: Routes to IT Admin and Hiring Manager.
On Reject: Returns to New Hire with comments.
Escalation: If no action in 24 h, reminder to HR Manager and CC Department Head.
HR Approval → IT Admin Task
Status Name: Pending IT Provisioning
Notification: “HR has approved new hire [First Name Last Name]. IT Admin, please provision accounts and hardware.”
Conditional Branch: Skip hardware if Employment Type = Contractor.
Escalation: If no action in 48 h, reminder to HR Manager.
IT Admin Task → Hiring Manager Task
Status Name: Pending Manager Setup
Notification: “IT has completed provisioning for [New Hire]. Hiring Manager, schedule orientation and assign mentor.”
Escalation: If no action in 48 h, reminder to HR Manager.
Hiring Manager Task → Facilities Clearance (if applicable)
Status Name: Pending Facilities Setup
Notification: “Hiring Manager confirmed workspace for [New Hire]. Facilities Coordinator, please prepare desk and badge.”
Conditional Branch: Skip if Employment Type = Remote.
Escalation: If no action in 72 h, reminder to HR Manager and Building Supervisor.
Facilities Clearance → Onboarding Complete
Status Name: Onboarding Complete
Notification: “The onboarding process for [New Hire] is complete. Welcome package delivered, and first-day checklist is ready.”
Transform your AI-powered approvals
Implementation Steps in Cflow
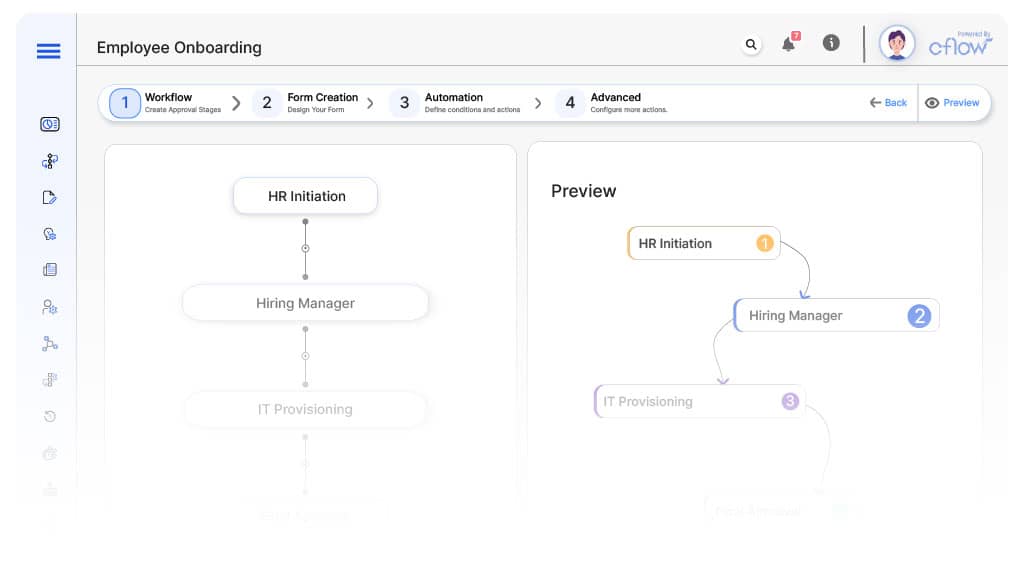
Step 1: Create Workflow
Step 2: Design the Form
Step 3: Set Up User Roles/Groups
Step 4: Build Process Flow
- Submission → HR Approval → IT Provisioning → Hiring Manager Setup → Facilities (if applicable) → Onboarding Complete
- Use gateways to skip IT/Facilities steps based on conditions (e.g., Employment Type = Remote or Contractor)
Step 5: Configure Notifications
Step 6: Apply Conditional Logic
Set gateway logic such as:
- Skip IT hardware step if Employment Type = Contractor
- Skip Facilities setup if Employment Type = Remote
Step 7: Save, Publish, and Test
Step 8: Adjust Based on Testing
- Field visibility
- Incorrect routing
- Missing or incorrect notifications
Step 9: Go Live
Example Journey: “John’s Onboarding”
John from Sales accepts his offer on June 10, 2025, and HR creates an onboarding request. Cflow auto-generates ID: ONB-0456, with Start Date July 1, 2025, and Employment Type “Full-Time.” HR Manager approves on June 11; IT Admin provisions email and laptop on June 12. Hiring Manager schedules orientation for July 1 and assigns Mentor “Sarah from Sales.” Facilities prepares Desk 24, and John’s welcome package arrives June 30—completing his onboarding.
FAQ's
Setting up a basic onboarding workflow takes about 30–60 minutes, including form creation and role configuration. Testing and minor adjustments may add another 30 minutes before going live.
Yes. You can edit the workflow at any time—add new approval nodes, update user groups, and republish. Changes apply to all future onboarding requests automatically.
Absolutely. Cflow offers API and pre-built connectors (e.g., Workday, BambooHR) to sync employee records. When a new hire is created in your HRIS, Cflow can auto-generate the onboarding form with all key details.
Cflow’s mobile-responsive interface lets HR, IT, and managers approve tasks, complete checklists, and send notifications from any smartphone or tablet—ensuring no delays, even when offsite.
Unleash the full potential of your AI-powered Workflow